Step sequencer
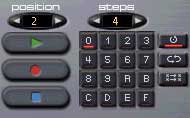
the sequencre contains 16 patterns (0-F) that can be highlighted by clicking with the mouse. a specific pattern can also be chosen in the position box. one single pattern consist of 16 1/16 notes. you can choose the parameters accent and slide seperately for each note.

sequencer modes

the sequencer mode defines how multiple patterns are played. you can choose between single loop, global loop and shuffle.
  • single-loop
  • plays the current pattern in a never ending loop. use this feature if you want to do some realtime composing since you can change the accent and slide buttons while the pattern is playing.
  • global-loop
  • Plays the selected pattern range in a loop. for example: You have edited pattern 0 to 4 with different sequences and want them to play in an endless loop. click on pattern 0, enter the step value of 4 and press the global loop button. press play afterwards.
  • shuffle-loop
  • the shuffle loop mode is similar to global mode but each time a pattern is finished, the following is chosen by random.

note entry

in order to enter notes into a pattern, the note entry should be highlighted by clicking on it with the mouse. now you can enter notes by your midi or pc keyboard:
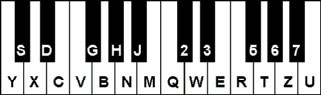
Note:
  • on some keyboard layouts the character keys may differ. but the program will adjust the keys to be layed out as a "piano keyboard". (for example, "y" and "z" are swapped on a us keyboard!
  • if a note should be "held" (played longer) you have to enter "..." in the following note entry by pressing space.
  • press del to delete a note entry. it will be marked with "---" afterwards.
  • you can transpose a note by one octave by using page up/page down.
  • cursor up/down transposes the note by a single note.
  • cursor right/left can be used to position the entry box in the note field.
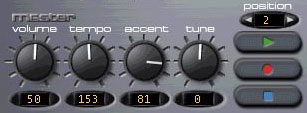
accent (AC)

every note entry has its own "AC" button. if it is pressed, the note is more accentuated when played (it is played louder and the filter sweep goes up to higher frequencies). you can get different rhythmic patterns in your basslines by changing the accents. just try it.

the amount of accent can be controlled via the accent slider on the lower left.
slide (SL)
every note entry has its own "SL" button. notes marked with a slide move from the previous note value up to the current. The note will not be played, only if the accent button is pressed. the time for the slide is constant (1/16).
Potential interesting 3rd party stuff.


Basic elements
  • play button
  • starts the sequencer. the LEDs will start to flicker and every true techno freak will start raving...
  • record button
  • if you press the record button, all the audio data generated by the synthesizer will be buffer. when you press stop, you will be asked to enter a file name for saving and the buffer will be written to disk as a .wav file in 16bit 44.1khz so you can use your cool baseline sounds in other programs.
  • volume
  • this knob controls the main volume of the synthesizer. if it is too high, the audio output will be distorted and the life-span of your speakers will drop considerably :).
  • tempo
  • changes the tempo of the synthesizer. the groove section will adjust automatically to the new tempo setting. right next to the knob the tempo is displayed in beats per minute, based on the assumption that 4 notes equal one beat in a pattern. you can also enter the tempo directly by double-clicking on the bpm display.
  • accent
  • changes the amount of accent.
  • tune
  • variates the base pitch for the synthesizer.
Oscillators
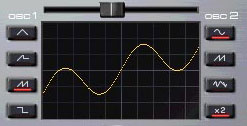
oscillators are the sources used for synthesizer sound generation. RubberDuck has two oscillators that can be used at the same time, each with different oscillator patterns. in addition you can morph between the two oscillators.
  • oscillator 1 (osc1): triangle,saw,square.
  • oscillator 2 (osc2): sine,saw,noise.
the different waveforms have very different characteristics. a sine wave for example sounds very smooth while a square is kinda hardcore. but you will find out about this as soon as you play around a little bit. choose the desired waveform for oscillator 1 on the left side of the waveform display. do so respectively for oscillator 2 on the right side. the button marked "2x" multiplies the frequency of osc2 by two, doubling the pitch of the tone. with the slider below the waveform display you can now easily morph between the oscillators to create really weird waveforms.
Filters
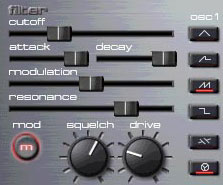
filters are one of the most exciting things that can ever happen to a clear waveform.
no doubt it is the most important tool in electronic music production. RubberDuck uses a dynamic 4 Pol (24dB) low pass filter.
cutoff slider
the cutoff frequency is the lowest frequency that can be reached by a filter sweep. all frequencies below are thus not influenced by the filter. this parameter is also linked with modulation.
attack/decay slider
controls the attack and decay rate of the volume and filter envelope. a slow attack/decay rate will generate pad like sounds, while a faster rate will generate percussive sounds.
modulation slider
this knob variates the amount of filter modulation. the filter is modulated each time a note is played. the modulation is responsible for the typical "barking" sound of the 303. it is also linked with the cuttoff frequency.
resonance slider
defines the amount of resonance in the lowpass filter. a high resonance will drive the filter to self-oscillation thus generating screaming acid sounds.
squelch
changes the resonance spectrum. The resulting sound is even more thrilling.
drive
this is an overdrive in the resonance part of the filter that will generate plastic like acid sounds.
modification
disables the filter modification model (tweet&tweak). this will result in a smoother sound.
tweet (right top button from drive)
this is a variation of the lowpass filter that equals a distortion module before the filter resulting in ver nasty sounds. in order to use this function, the filter modification button has to be activated.
tweak (lower right button from drive)
raises the high pitch in the resonance part resulting in a brighter sound. in order to use this function, the filter modification button has to be activated.